FRDM-KL43Z快速入门
1. 连接
让我们开始试用FRDM-KL43Z!您可以选择观看短片中的操作顺序或遵循下面列出的详细操作。
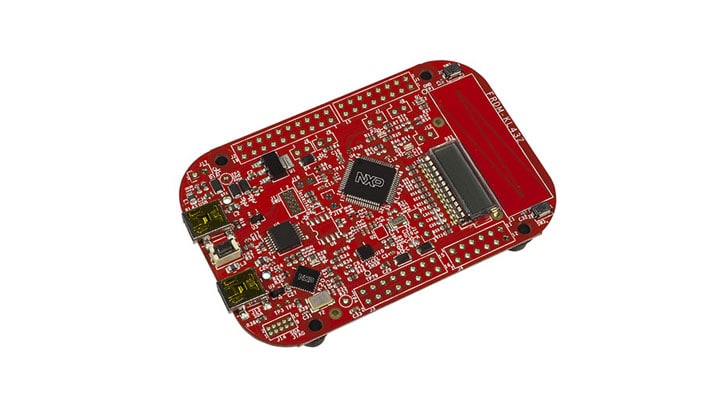
1.1 FRDM-KL43Z板快速入门
2. 获取软件
2.1 为FRDM-KL43Z安装软件
2.2 采用Kinetis SDK,快速开始设计
Kinetis软件开发套件(SDK)为免费附赠,包含所有硬件抽象和外设驱动软件的完整源代码,根据宽松的开源许可提供。
点击以下链接,下载适合您的计算机操作系统的SDK版本。
2.3 安装工具链
恩智浦提供名为Kinetis Design Studio (KDS)的免费工具链。

想使用不同的工具链?
如果想使用其他工具链,Kinetis SDK支持IAR 、Keil 和命令行GCC 等其他工具。

2.4 PC配置
许多示例应用通过MCU UART输出数据,因此需要确保已安装了该板虚拟COM端口的驱动程序。将板连接至PC后,驱动程序应自动安装。如果驱动程序未自动安装,请点击这里 下载安装程序。

安装了串行端口驱动程序后,运行您喜欢的终端应用程序,查看MCU UART的串行输出。将终端的波特率配置为115200,数据位配置为8,无奇偶校验位且停止位为1。如需确定FRDM-KL43Z虚拟COM端口的端口号,请打开设备管理器并在“端口”分组下查找。
不确定如何使用终端应用?尝试以下任一教程:Tera Term教程、PuTTY教程。
3. 构建、运行
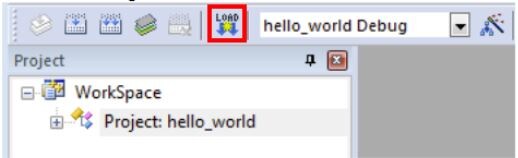
3.1 在FRDM-KL43Z上构建并运行SDK演示
3.2 浏览SDK示例代码
Kinetis SDK附带一系列示例应用代码。如需查看内容,请浏览SDK安装中的SDK boards文件夹,并选择板FRDM-KL43Z(
如需了解有关演示应用或驱动程序示例的更多信息,请打开“Kinetis SDK演示应用用户指南”,位于
3.3 构建、运行并调试SDK示例
如果您对其中的一个或几个示例应用感兴趣,可能想知道如何自己完成构建和调试。Kinetis SDK快速入门指南按步骤介绍了如何轻松地为支持的所有工具链配置、构建和调试SDK示例代码。
使用以下指南,了解如何使用Kinetis Design Studio (KDS) IDE打开、构建和调试示例应用。
采用Kinetis Design Studio IDE运行演示
下载PDF 。
安装KDS更新
开始使用配备KSDK的KDS IDE之前,建议确保工具为最新版本。以下展示的步骤针对Windows版本的KDS,但对于Mac和Linux用户同样适用。
-
选择"Help" -> "Check for Updates"(帮助->查看更新)。
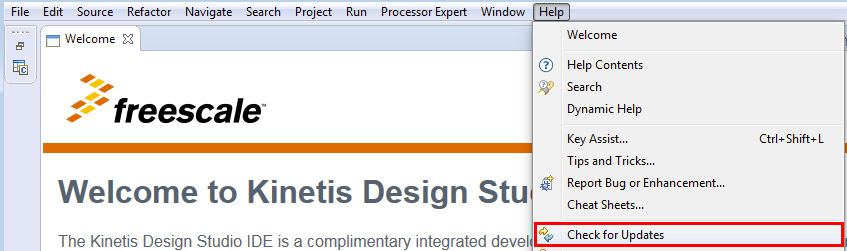
- 安装来自恩智浦的所有更新——这些由“com.NXP.xxx”或“com.nxp.xxx”表示。工具链或调试接口可能也有更新。大多数情况下,安装这些额外的更新不会有问题,但这些更新不是KDS工具链发布的一部分,所以可能会引发问题。
构建示例应用
遵循以下步骤运行hello_world应用。对于其他示例应用,这些步骤可能会略有不同,因为某些应用的路径可能会有额外的文件夹层级。
-
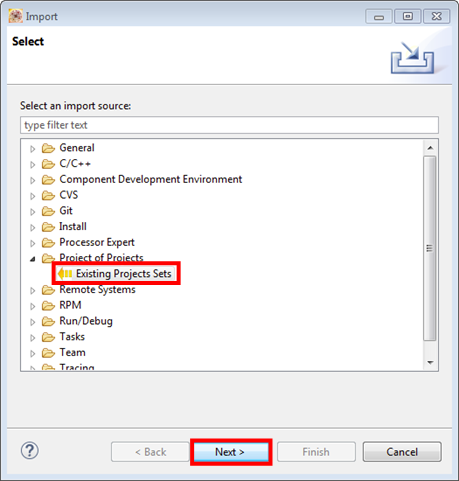
从KDS IDE菜单选择"File->Import"(文件->导入)。在显示的窗口中,展开"Project of Projects"文件夹并选择"Existing Project Sets"。然后,点击"Next"(下一步)按钮。
-
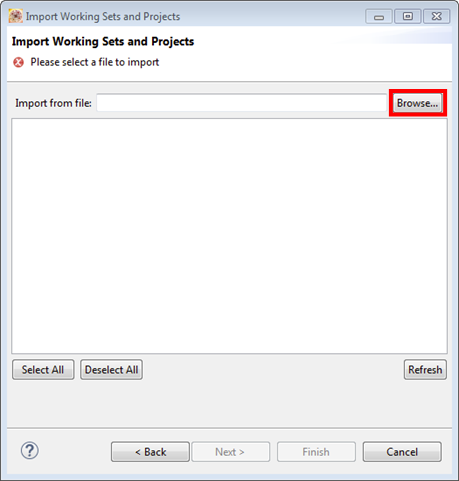
点击"Import from file:"(从文件导入:)选项旁边的"Browse"(浏览)按钮。
-
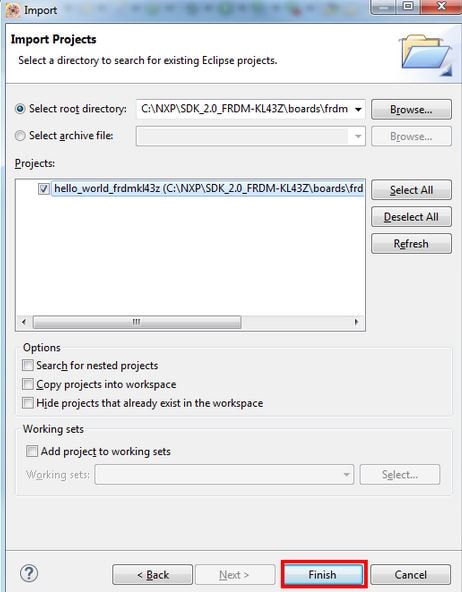
指向以下路径的示例应用项目:
/boards/ / / /kds 对于本指南,请选择以下位置:
/boards/frdmkl43z/demo_apps/hello_world/kds -
指向正确目录后,"Import Working Sets and Projects"(导入工作集和项目)窗口显示如下图 。点击"Finish"(完成)按钮。
-
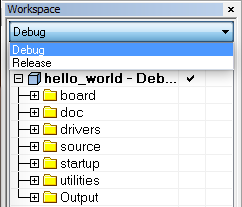
每个KSDK项目支持两种项目配置(构建目标):
- 调试——编译器优化设置为低,生成可执行文件的调试信息。选择此目标是为了开发和调试
- 释放——编译器优化设置为高,不生成调试信息。选择此目标是为了最终应用部署
-
选择适当的构建目标,"Debug"或"Release",方法是点击锤子图标旁的向下箭头,如下所示。在这个示例中,选择"Debug"(调试)目标。

-
选择构建目标后,平台库开始构建。未来重建该库时,只需点击锤子图标(假定会选择同一构建目标)
运行示例应用
FRDM-KL43Z板出厂时预装了mbed/CMSIS-DAP接口。如果您已经更改了板上的调试OpenSDA应用,请访问OpenSDA,了解如何更新板或将板恢复到出厂状态。
-
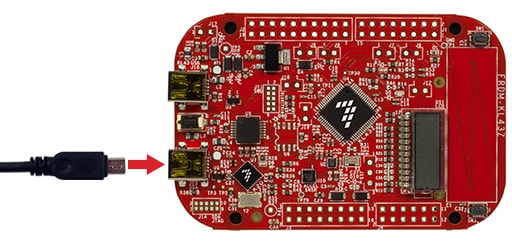
通过板上"SDAUSB" USB端口和PC USB连接器之间的USB线缆,将开发平台连接到PC。
-
打开PC上的终端应用(如PuTTY或Tera Term),并连接到之前确定的调试COM端口。采用以下设置配置终端:
- 波特率为115200
- 无奇偶校验位
- 数据位为8
- 停止位为1
以下命令仅适用于Linux操作系统用户,在终端运行。根据KDS IDE所需,将
libudev安装到系统,以便启动调试器:user@ubuntu:~$ sudo apt-get install libudev-dev libudev1user@ubuntu:~$ sudo ln -s /usr/lib/x86_64-linux-gnu/libudev.so /usr/lib/x86_64-linux-gnu/libudev.so.0 -
确保调试器的配置与想连接的目标相符。这里指的是板的OpenSDA接口。如果不确定板的型号,请参阅PDF的附录B。
-
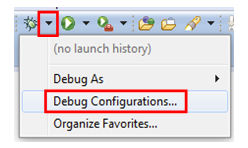
要查看可用的调试器配置,点击绿色"Debug(调试)"按钮旁向下的小箭头,并选择"Debug Configurations(调试配置)。
-
在Debug Configurations(调试配置)对话框中,选择与正在使用的硬件平台对应的调试配置。对于Windows或Linux用户,选择OpenOCD下的"mbed/CMSIS-DAP"选项。对于Mac用户,选择"J-Link"
选择了调试器接口后,点击"Debug"(调试)按钮启动调试器

-
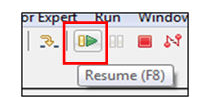
此应用下载到目标,并自动运行到main()函数:

点击"Resume"(继续)按钮启动应用:
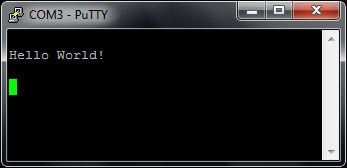
hello_world应用开始运行,标语显示在终端上。如未显示,请检查您的终端设置和连接
想使用其他工具链?
采用IAR运行演示
下载PDF 。
构建示例应用
遵循以下步骤运行hello_world应用。对于其他示例应用,这些步骤可能会略有不同,因为某些应用的路径可能会有额外的文件夹层级。
-
如果还未完成,在以下路径中打开所需的示例应用工作区:大多数示例应用工作区文件位于以下路径:
/boards/ / / /iar 以
hello_world演示为例,路径为:/boards/frdmkl43z/demo_apps/hello_world/iar -
从下拉列表中选择所需的构建目标。在这个例子中,选择"hello_world-Debug"目标
-
要构建应用,点击"Make"按钮(下文中用红色突出显示)。

-
构建将完成,并且不会报错。
运行示例应用
FRDM-KL43Z板出厂时预装了PEmicro调试接口。如果您已经更改了板上的调试OpenSDA应用,请访问OpenSDA,了解如何更新板或将板恢复到出厂状态。
-
通过板上"SDAUSB" USB端口和PC USB连接器之间的USB线缆,将开发平台连接到PC。
-
打开PC上的终端应用(如PuTTY或Tera Term),并连接到之前确定的调试COM端口。采用以下设置配置终端:
- 波特率为115200
- 无奇偶校验位
- 数据位为8
- 停止位为1
-
点击"Download and Debug"(下载和调试)按钮,将应用下载到目标。

-
然后,可将此应用下载到目标应用,并自动运行到main()函数。

-
点击"Go"按钮运行代码,以启动应用。

-
hello_world应用开始运行,标语显示在终端上。如未显示,请检查您的终端设置和连接
采用Keil® MDK/µVision®运行演示
安装CMSIS设备包
安装MDK工具后,必须安装Cortex®微控制器软件接口标准(CMSIS)设备包,才能从调试角度来说完全支持该设备。这些设备包内含存储器映射信息、寄存器定义和闪存编程算法。按照这些步骤安装相应的CMSIS包。
-
打开名为µVision的MDK IDE。在IDE中,选择"Pack Installer"图标

-
在Pack Installer(包安装程序)窗口,转到含有Kinetis包的部分(这些包按字母顺序排列)。Kinetis包名以"Keil::Kinetis"开始,然后是MCU系列名称,例如"Keil::Kinetis_KLxx_DFP"。该示例采用FRDM-KL43Z平台,因此选择Kinetis KLxx_DFP系列的设备包。点击设备包旁的"Install"(安装)按钮。这个流程需要互联网连接才能成功完成。
-
安装完成后,关闭Pack Installer窗口并返回到µVision IDE。
构建示例应用
遵循以下步骤运行hello_world应用。对于其他示例应用,这些步骤可能会略有不同,因为某些应用的路径可能会有额外的文件夹层级。
-
如果还未完成,在以下路径中打开所需的演示应用工作区:
/boards/ / / /mdk 此工作区文件名为
.uvmpw,因此在这个具体示例中,实际路径为: /boards/frdmkl43z/demo_apps/hello_world/mdk/hello_world.uvmpw -
要构建演示项目,请选择用红色突出显示的"Rebuild"按钮。

-
构建将完成,并且不会报错。
运行示例应用
FRDM-KL43Z板出厂时预装了mbed/CMSIS-DAP调试接口。如果您已经更改了板上的调试OpenSDA应用,请访问OpenSDA,了解如何更新板或将板恢复到出厂状态。
-
通过板上"SDAUSB" USB端口和PC USB连接器之间的USB线缆,将开发平台连接到PC。
-
打开PC上的终端应用(如PuTTY或Tera Term),并连接到之前确定的调试COM端口。采用以下设置配置终端:
- 波特率为115200
- 无奇偶校验位
- 数据位为8
- 停止位为1
-
应用构建完成后,点击"Download"(下载)按钮,将应用下载到目标
-
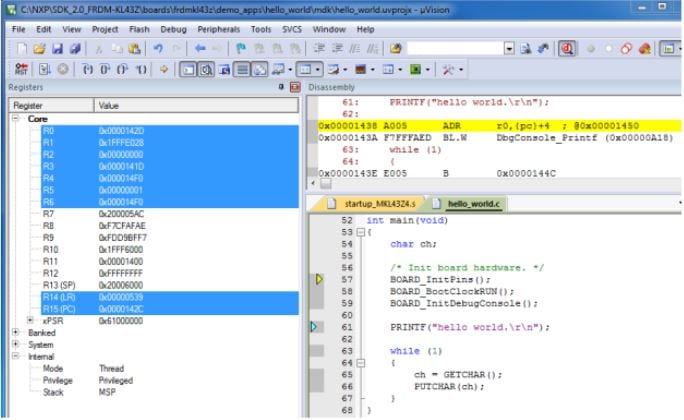
点击"Download"(下载)按钮后,此应用下载到目标并开始运行。如需调试应用,请点击"Start/Stop Debug Session"(开始/停止调试会话)按钮(用红色突出显示)
-
点击"Run"(运行)按钮运行代码,以启动应用

-
hello_world应用开始运行,标语显示在终端上。如未显示,请检查您的终端设置和连接
采用Arm® GCC运行演示
下载PDF 。
安装工具链
本节包含采用Kinetis SDK支持的Arm GCC工具链构建并运行KSDK演示应用所需的必要组件的安装步骤。Arm GCC工具有许多使用方式,但此例主要演示其在Windows环境中的使用。虽然这里未讨论,但GCC工具还可与Linux操作系统和Mac OSX配套使用。
安装GCC Arm嵌入式工具链
从GNU Arm Embedded Toolchain 下载并运行安装程序。这是实际的工具链(例如,编译器、链接器等)。GCC工具链应当对应最新的支持版本,参见Kinetis SDK版本说明。
安装MinGW
Minimalist GNU for Windows (MinGW)开发工具提供了一套不依赖第三方C-Runtime DLL (如Cygwin)的工具。KSDK所用的构建环境无需使用MinGW Build工具,但充分利用了MinGW和MSYS的基础安装。MSYS提供了一个具有类UNIX界面和相关工具的基本Shell。
-
从以下位置下载最新的MinGW
mingw-get-setup安装程序:MinGW - Minimalist GNU for Windows Files -
运行安装程序。推荐的安装路径为
C:\MinGW,也可将其安装到任何位置 -
确保在Basic Setup菜单下选择了"mingw32-base"和"msys-base"。

-
点击Installation(安装)菜单中的Apply Changes(应用更改),并按照其余指令完成安装
-
在Windows操作系统的Path环境变量中添加相应的项目。可在Control Panel->System and Security->System->Advanced System Settings(控制面板→系统和安全→系统→高级系统设置)下的"Environment Variables..."(环境变量)部分找到它。路径为:
\bin 假设默认安装路径为
C:\MinGW,此例如下所示。如果路径设置不正确,工具链将无法正常运行。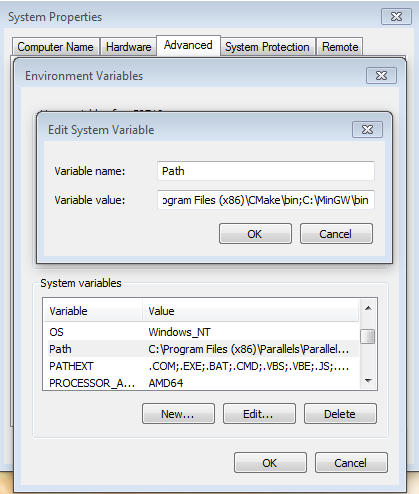
为ARMGCC_DIR添加新环境变量
- 创建新的系统环境变量并命名为ARMGCC_DIR。此变量的值应当指向Arm GCC嵌入式工具链安装路径,此例中的安装路径为:
- 参考GNU Arm GCC嵌入式工具的安装文件夹,获得确切的安装路径名
C:\Program Files (x86)\GNU Tools Arm Embedded\4.9 2015q3
安装CMake
-
从以下位置下载CMake 3.0.x:CMake
-
安装CMake,确保安装时选择"Add CMake to system PATH"(在系统PATH中添加CMake)选项。由用户选择是为所有用户还是只为当前用户将其安装到PATH。在这个示例中,假设为所有用户安装了此应用
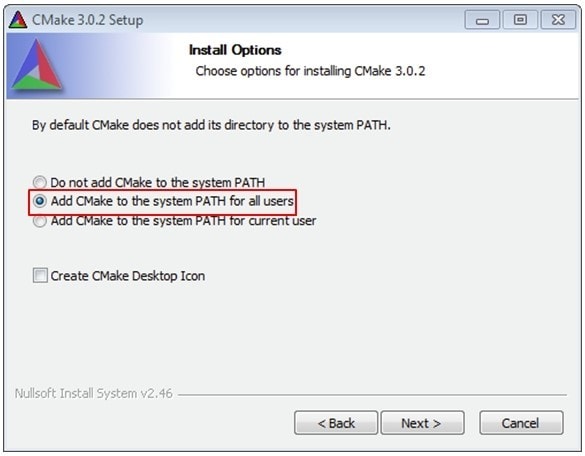
-
按照安装程序的其余指令操作
-
可能需要重启系统,才能使PATH更改生效
构建示例应用
要构建示例应用,请按照这些步骤操作:
-
如未运行,则打开GCC Arm嵌入式工具链命令窗口。要启动窗口,需从Windows操作系统“开始”菜单进入"Programs → GNU Tools Arm Embedded
" ,然后选择"GCC Command Prompt" 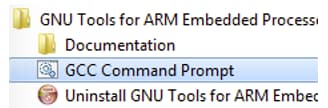
-
将目录更改为示例应用项目目录,路径如下:
/boards/ / /armgcc 对于本指南,确切的路径为:
/boards/frdmkl43z/demo_apps/hello_world/armgcc -
在命令行输入"build_debug.bat"或双击Windows操作系统Explorer中的"build_debug.bat"文件,执行构建。输出显示如图:

运行示例应用
GCC工具需要J-Link调试接口。要将板上的OpenSDA固件更新为最新的J-Link应用,请访问OpenSDA。安装J-Link OpenSDA应用后,从SEGGER Downloads 下载J-Link驱动程序和软件包。
-
通过板上"SDAUSB" USB端口和PC USB连接器之间的USB线缆,将开发平台连接到PC。
-
打开PC上的终端应用(如PuTTY或Tera Term),并连接到之前确定的调试COM端口。采用以下设置配置终端:
- 波特率为115200
- 无奇偶校验位
- 数据位为8
- 停止位为1
-
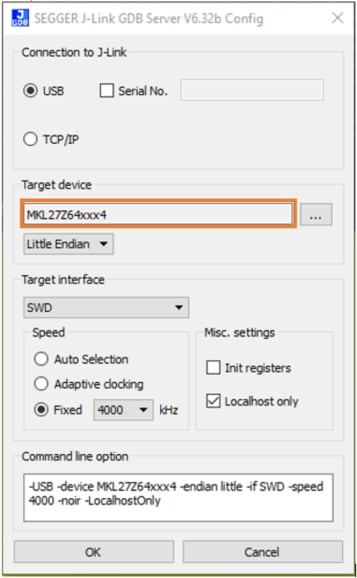
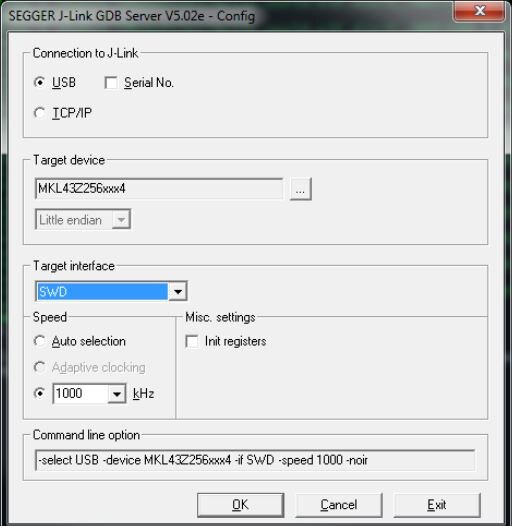
打开J-Link GDB Server应用。假设已安装了J-Link软件,进入Windows操作系统的“开始”菜单并选择"Programs → SEGGER → J-Link
J-Link GDB Server",可以启动此应用。 -
修改设置,如下所示。这个示例中所选的目标设备为"MKL43Z256xxx4",并使用SWD接口。
-
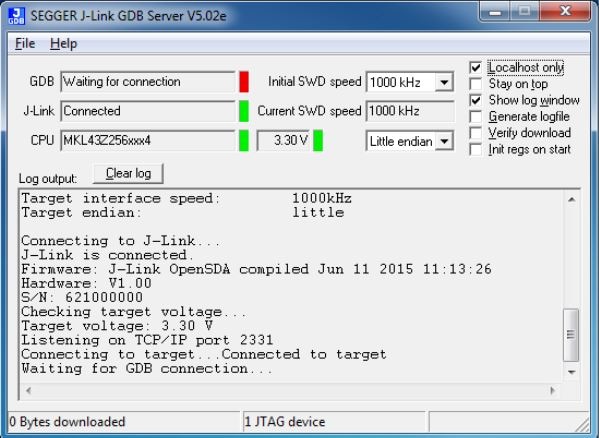
设备连接后,屏幕显示如图:
-
如未运行,则打开GCC Arm嵌入式工具链命令窗口。要启动窗口,需从Windows操作系统“开始”菜单进入"Programs → GNU Tools Arm Embedded
" ,然后选择"GCC Command Prompt" 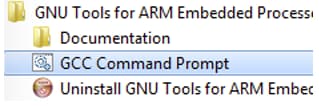
-
更改为包含演示应用输出的目录。根据所选的构建目标,使用以下两个路径之一可以找到此输出:
/boards/ / / /armgcc/debug /boards/ / / /armgcc/release 在这个示例中,路径为:
/examples/frdmkl43z/demo_apps/hello_world/armgcc/debug -
运行命令:
arm-none-eabi-gdb.exe.elf 例如,它是:
arm-none-eabi-gdb.exe bubble_level_ftm.elf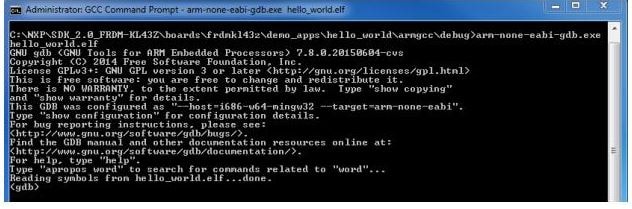
-
运行以下命令:
- target remote localhost:2331
- monitor reset
- monitor halt
- load
- monitor reset
- 此应用已下载成功并停留在复位矢量。执行"monitor go"命令来启动演示应用。
- hello_world应用开始运行,标语显示在终端窗口上。

4. 创建
4.1 为FRDM-KL43Z创建应用
4.2 获取SDK Project Generator
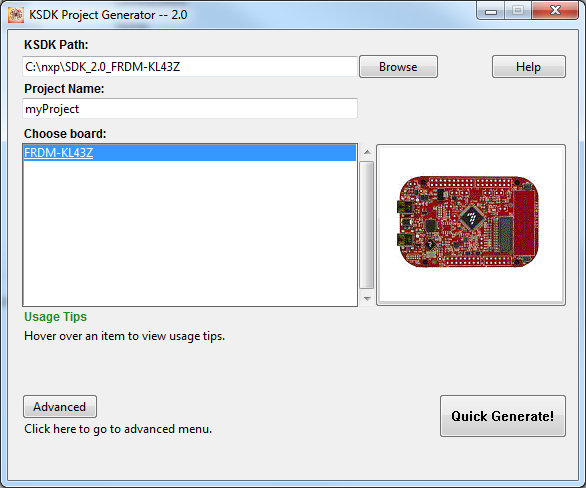
让我们创建自己的项目,制作基于SDK的简单应用。恩智浦提供直观、简单的项目生成工具,允许基于Kinetis SDK创建定制项目。
4.3 运行SDK Project Generator
解压ZIP文件后,点击操作系统对应的“KSDK_Project_Generator”可执行文件,打开此工具。将此工具指向SDK安装路径,给项目命名并选择可用作参考板的板。点击"Quick Generate"(快速生成)按钮完成。
4.4 打开项目
新项目将位于
4.5 编写代码
现在,让新项目执行除无限循环以外的其他功能。SDK示例提供板级支持包(BSP)宏来完成针对板的各种操作,包括针对LED灯、开关和外设实例等项目的宏命令和定义。为了简化操作,让我们使用BSP宏命令使LED灯闪烁。
采用以下代码更新项目的main.c文件中的main()函数:
volatile uint32_t delay;
BOARD_InitPins();
BOARD_BootClockRUN();
BOARD_InitDebugConsole();
PRINTF("myProject project\n\r");

// Enable the clock to the PORT module that the LED is on
CLOCK_EnableClock(kCLOCK_PortD);

// Set the PORT configuration from DISABLED to GPIO
PORT_SetPinMux(BOARD_LED_GREEN_GPIO_PORT, BOARD_LED_GREEN_GPIO_PIN, kPORT_MuxAsGpio);

// Initialize the green LED
LED_GREEN_INIT(LOGIC_LED_OFF);

for (;;)
{
LED_GREEN_TOGGLE();
delay = 5000000;
while(delay--);
}4.6 构建、下载和运行
更改完main()函数后,开始构建应用。一旦构建完成,将应用下载到板。
如需了解如何构建、下载或运行应用,请参考第3.3节中的专用工具指南。
4.7 成功
应用下载完后,您会看到FRDM-KL43Z的绿色LED灯闪烁。还可以使用PRINTF查看终端输出。
Tera Term教程
Tera Term教程
Tera Term是一款备受欢迎的开源终端仿真应用。此程序可用来显示从恩智浦开发平台虚拟串行端口发送的信息。
- 从SourceForge下载Tera Term。下载完成后,运行安装程序,然后返回到该页面继续操作
- 启动Tera Term。首次启动时,会显示以下对话。选择串行选项。假设已连接了板,列表中会自动填充一个COM端口。
- 配置串行端口设置(使用之前确定的COM端口号),波特率为115200,数据位为8,无奇偶校验位,停止位为1。要进行此操作,进入Setup→Serial Port (设置→串行端口)并更改设置。
- 确认连接已打开。如已连接,Tera Term将在标题栏中显示以下内容
- 一切就绪

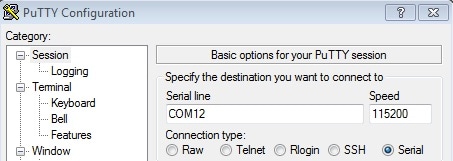
PuTTY教程
PuTTY教程
PuTTY是一款备受欢迎的终端仿真应用。此程序可用来显示从恩智浦开发平台虚拟串行端口发送的信息。
- 使用以下按钮下载PuTTY。下载完成后,运行安装程序,然后返回到该页面继续操作。
- 启动PuTTY,可双击下载的*.exe文件或从“开始”菜单启动,具体取决于您所选的下载类型。
- 在启动的窗口中进行配置,选择"Serial"单选按钮并输入之前确定的COM端口号。还要输入波特率,在本例中,为115200。
- 点击“Open”(打开),打开串行连接。假设板已连接,并已输入正确的COM端口,此终端窗口会打开。如果配置不正确,PuTTY将会发出提示。
- 一切就绪
设计资源
支持
故障排除
您的板是这样的包装吗?
没问题!您的板是旧封装,闪存存储器中预装了不同的开箱即用演示。
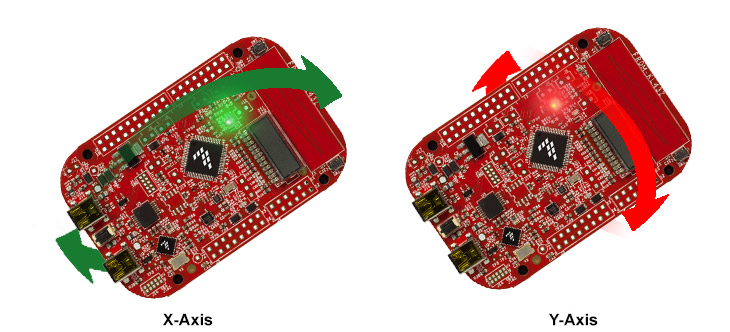
您将看到红色和绿色LED指示灯来回切换。一切就绪时,可以进行下一步。
仍然不能用?
试着按步骤继续操作,获得板上运行的其他示例应用。如果仍有问题,请通过恩智浦技术社区 与我们联系。