FRDM i.MX 95 Pro开发板快速入门
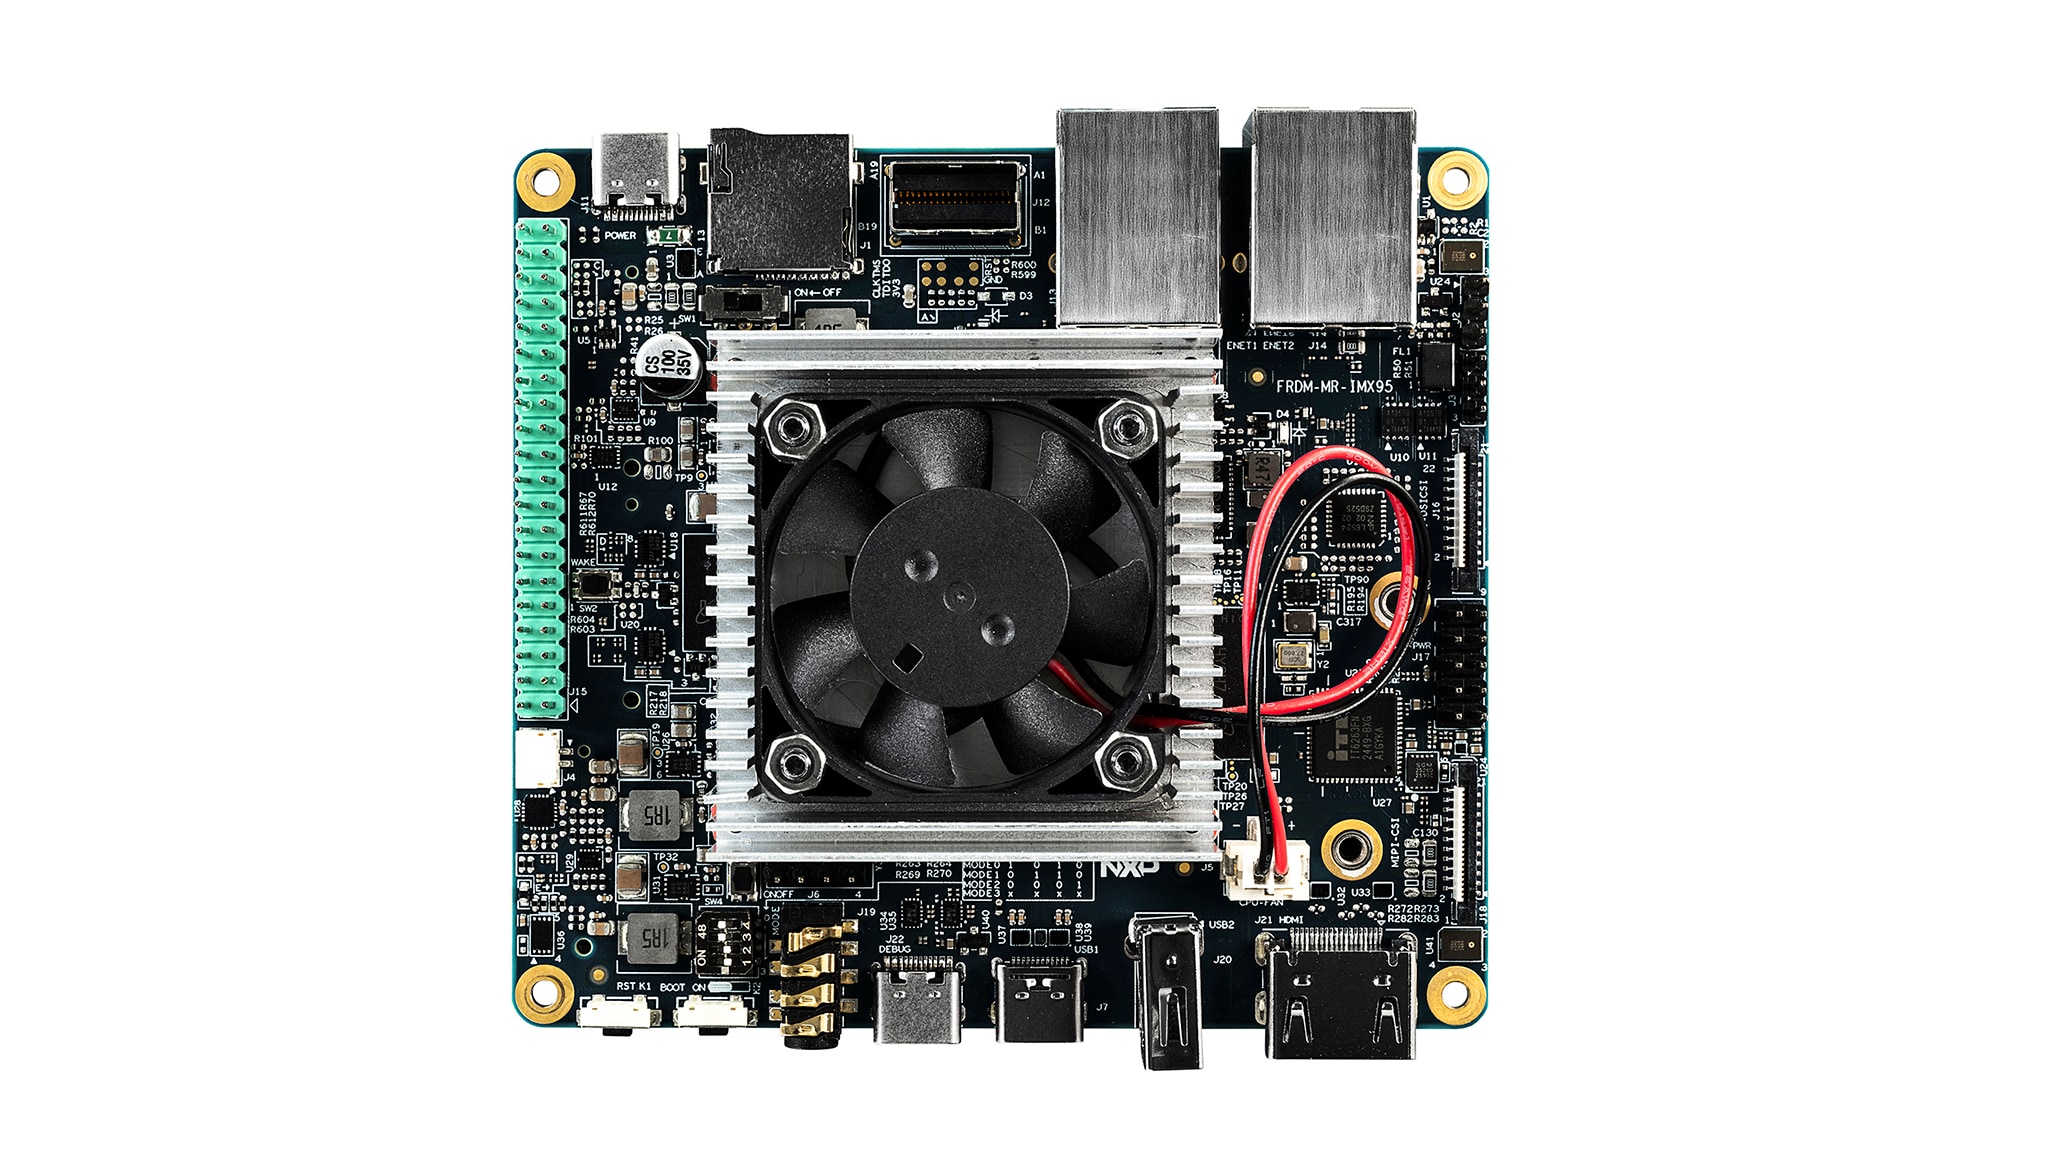
1. 开箱即用
下面描述了启动FRDM-IMX95-PRO板的步骤。
1.1 套件内含物/装箱单
该套件内含物包括:
- FRDM i.MX 95 PRO开发板(FRDM-IMX95-PRO)
- 1个M.2模块,PN:LBES5PL2EL;Wi-Fi 6/BT 5.3/IEEE802.15.4
- 1根USB Type-C公头转USB Type-C公头数据线,白色
- 1个USB Type-C公头转USB Type-C公头PD数据线,黑色
- 4个紧固件,M2.5 * 20 + 6mm尼龙支架
- 快速入门指南
按照演示视频所示步骤,开始采用FRDM-IMX95-PRO板开发应用。如需了解更多信息,请访问i.MX 95应用处理器文档。
1.2 熟悉板
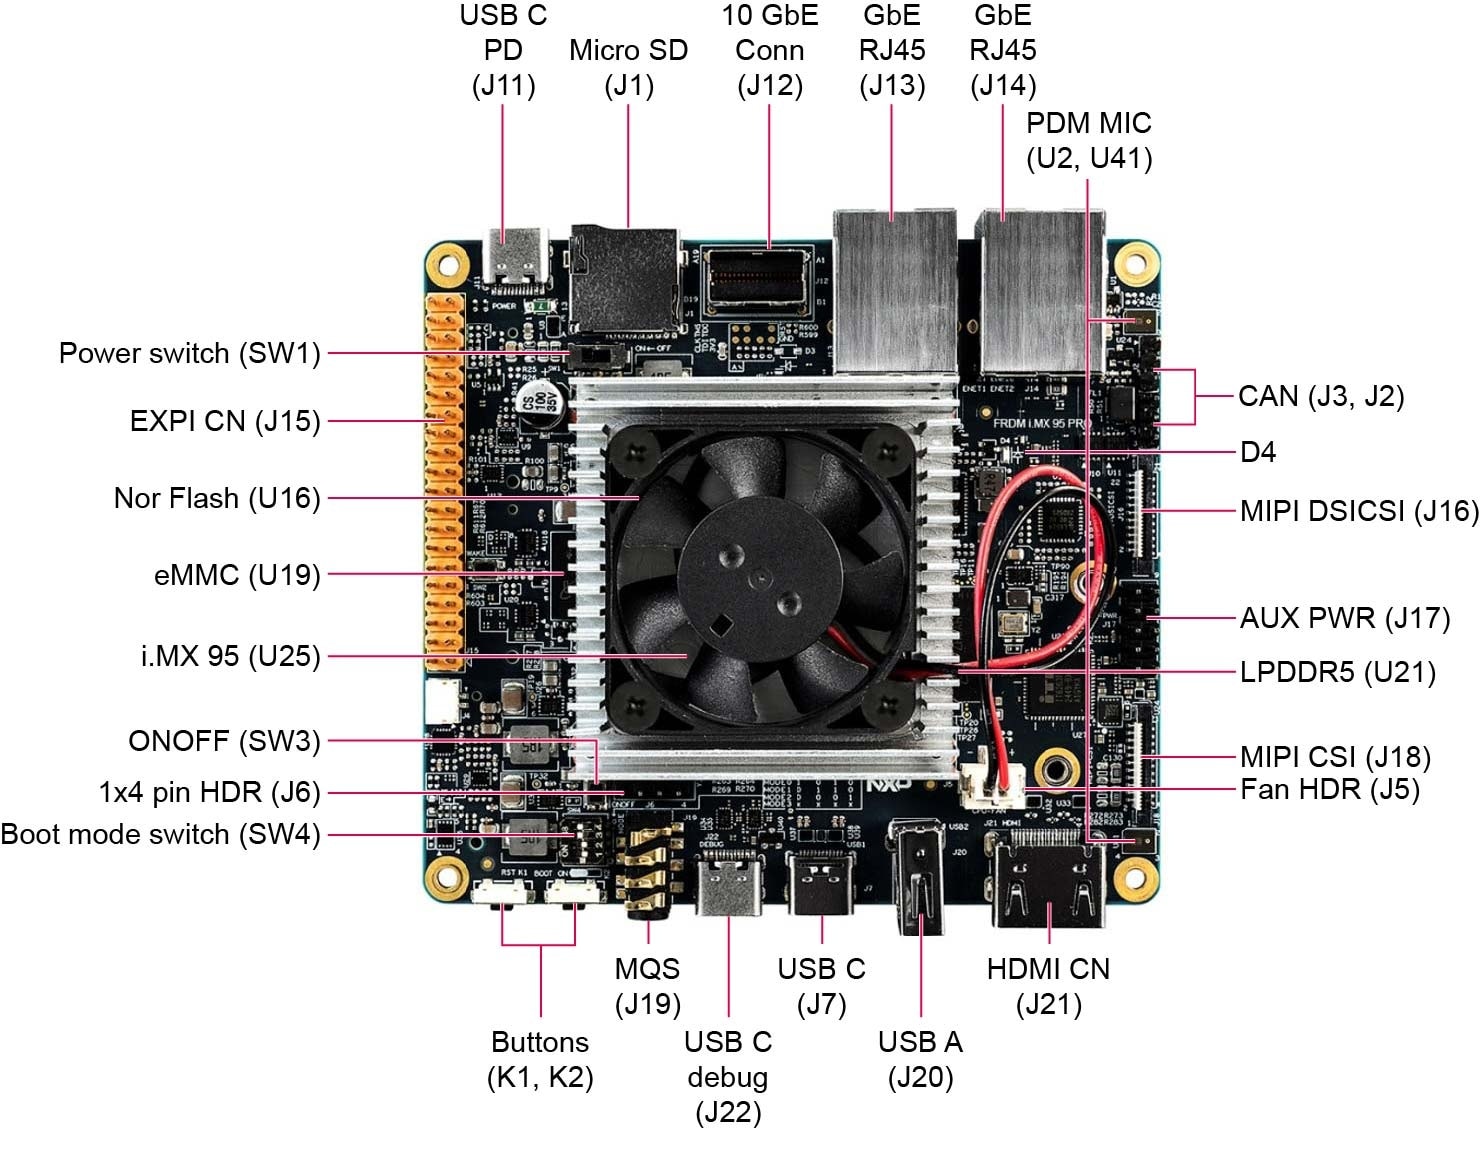
下图展示了FRDM-IMX95-PRO板正面的主要组件。
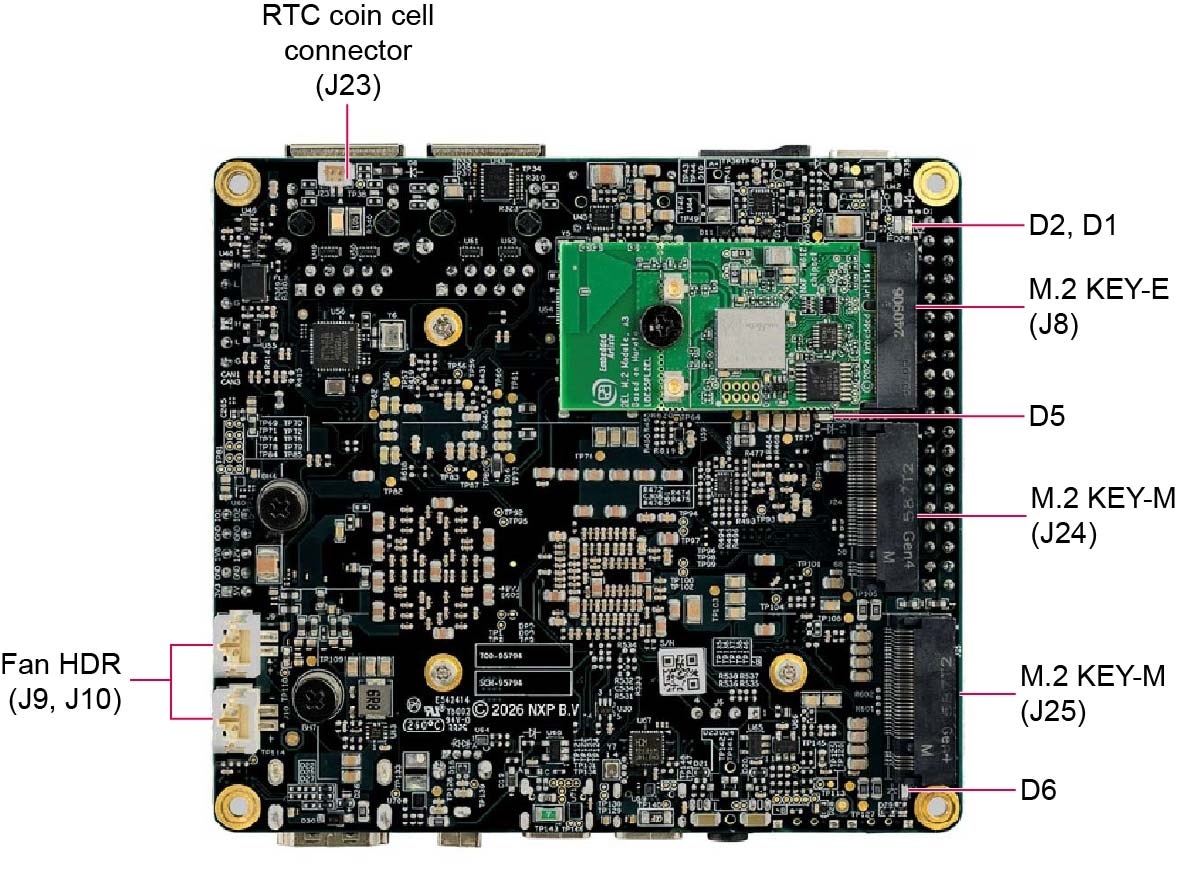
下图展示了FRDM-IMX95-PRO板底部的主要组件。
1.3 从eMMC启动
FRDM-IMX95-PRO板配备一个预构建的恩智浦Linux二进制演示镜像,烧写在eMMC上。在无需修改内部二进制文件的情况下,从eMMC启动将提供具有某些功能的默认系统,用于在Linux上构建其他应用。
如需了解有关恩智浦Embedded Linux的更多详情,请继续阅读后续章节。
1.4 连接USB调试线缆
将随附的USB Type-C线连接到调试UART端口J22,然后将另一端连接到主机。
主机上将会检测到4个UART接口。强烈建议将4个接口全部打开,因为A55、M33和M7内核的端口映射不固定。
如果您不熟悉终端应用,请先查看以下任一教程,再继续步骤1.5 “连接HDMI显示器”:Minicom教程、Tera Term教程、PuTTY教程。
要在Linux下进行调试,请确保已安装CH9114F Linux驱动程序 。
1.5 连接HDMI显示器
要查看随镜像二进制文件提供的用户界面,请将HDMI线连接至HDMI连接器J21。
1.6 启动开关设置
SW4 [1-4]是启动配置开关。默认情况下,启动设备是eMMC/uSDHC1。
BOOT_MODE3 SW4[1] |
BOOT_MODE2 SW4[2] |
BOOT_MODE1 SW4[3] |
BOOT_MODE0 SW4[4] |
启动内核 | 启动设备 |
|---|---|---|---|---|---|
| x | 0 | 0 | 1 | Cortex-M33 | 串行下载器(USB) |
| x | 0 | 1 | 0 | uSDHC1 8位eMMC 5.1 | |
| x | 0 | 1 | 1 | uSDHC2 4位SD3.0 | |
| x | 1 | 0 | 0 | FlexSPI串行NOR Flash |
1.7 接通电源
通过USB Type-C转Type-C线,将USB PD充电器连接至J11。然后滑动电源开关SW1,给板上电。USB PD充电器应支持20V/5A输出。
此板默认设置为从eMMC启动。处理器开始从eMMC执行可启动镜像。然后,U-Boot执行应自动开始。
信息在Arm Cortex-A55的串行控制台中打印输出。如果不停止U-boot流程,就会继续启动内核。
当板启动时,您会看到显示器的左上角出现企鹅,然后在左上角看到Linux终端图标,在右上角看到定时器。恭喜,已顺利启动并运行。
2. 获取软件
i.MX Linux板级支持包(BSP)包含一系列二进制文件、源代码和支持文件,可用来启动特定i.MX开发平台上的Embedded Linux镜像。
当前版本的Linux二进制演示文件请参见Linux下载页面。i.MX软件和开发工具中Linux部分的i.MX Linux文档包提供更多文档。
2.1 概述
FRDM-IMX95-PRO板支持从eMMC和SD卡启动。
本入门指南仅概述了将Linux BSP镜像烧录到SD卡的几种方法。如需烧录至板载eMMC,只需将所有命令中的"sd"替换为"emmc"即可。经验丰富的Linux开发人员可根据需要探究其他选项。
2.2 下载恩智浦Linux BSP预构建镜像
FRDM-IMX95-PRO板的最新预构建镜像可在最新Linux版本的Linux下载页面获取。
预构建的恩智浦Linux二进制演示镜像提供典型系统和基本的功能集,用于使用和评估该处理器。无需修改系统,用户就可以评估硬件接口、测试SoC功能并运行用户空间应用。
2.3 使用Universal Update Utility (UUU)烧写恩智浦Linux BSP镜像
除了“开箱即用”章节的连接外,还可使用合适的USB线将USB C (J7)连接到主机。
拔下电源适配器。参考第1.6节“启动开关设置”,将板配置为在串行下载协议(SDP)模式下启动。
根据主机使用的操作系统,将Linux BSP镜像烧录到SD卡的方式可能会有所不同。从下面的选项中进行选择,获取详细指导:
Linux®主机
以下为Linux主机的操作说明。
- 在Linux主机上安装UUU
uuulibusb1(通过apt-get或任何其它资源包管理器)- 将恩智浦Linux BSP镜像烧写到板上
从UUU GitHub页面 上下载最新的稳定版文件。如需有关UUU的进一步帮助,请参阅本详细教程 。
在默认情况下,本流程将镜像烧写到SD卡中。查看UUU GitHub页面 ,了解如何将镜像烧写到其他设备。
打开终端应用并将目录更改为uuu及FRDM-IMX95-PRO板的最新Linux发行版所在位置。向uuu文件添加执行权限并执行。uuu等待USB设备连接。
$ chmod a+x uuu
$ sudo ./uuu -b sd_all imx-boot-imx95-19x19-lpddr5-frdm-pro-sd.bin-flash_a55 imx-image-full-imx95evk.wic.zst
确认FRDM-IMX95-PRO板启动模式已切换至串行下载模式,然后启动板,uuu将镜像烧写到板上。
完成后,给板断电。参考第1.6节“启动开关设置”,配置板从SD卡启动。给板上电启动。
Windows®主机
以下为Windows主机的操作说明。
- 在Windows主机上安装UUU
uuu.exe- 串行USB驱动程序(取决于板和Windows安装情况——查看Windows设备管理器)
- 将恩智浦Linux BSP镜像烧写到板上
如需下载最新的稳定版文件,请访问UUU GitHub页面 。如需有关UUU的进一步帮助,请参阅本详细教程 。
在默认情况下,本流程将镜像烧写到SD卡中。查看UUU GitHub页面 ,了解如何将镜像烧写到其他设备。
打开命令提示应用,进入uuu.exe文件及FRDM-IMX95-PRO的Linux版本所在位置。
.\uuu.exe -b sd_all imx-boot-imx95-19x19-lpddr5-frdm-pro-sd.bin-flash_a55 imx-image-full-imx95evk.wic.zst确认FRDM-IMX95-PRO板启动模式已切换至串行下载模式,然后启动板,uuu开始将镜像烧写到板上。
完成后,给板断电。参考第1.6节“启动开关设置”,将板配置为从SD卡启动。给板上电启动。
3. 构建并运行
本节简要介绍了如何为FRDM-IMX95-PRO构建Yocto BSP镜像。
3.1 FRDM-IMX95-PRO Yocto BSP
FRDM-IMX95-PRO板的BSP每季度随i.MX系列Linux BSP同步发布。要使用源代码构建FRDM-IMX95-PRO镜像,请先查阅《i.MX Yocto Project用户指南》,熟悉Yocto Project和Yocto Build。然后,按照以下步骤为FRDM-IMX95-PRO构建镜像。下面以LF6.18.20 2.0.0 BSP为例。
- 下载最新的i.MX系列Linux BSP版本。
- Yocto Project设置:
- 构建镜像:
- 烧写SD卡镜像:
- 将启动开关
SW1[1:4]更改为“0011”以选择SD卡启动,插入SD卡,给FRDM-IMX95-PRO板上电。
$ repo init -u https://github.com/nxp-imx/imx-manifest -b imx-linux-wrynose -m imx-6.18.20-2.0.0.xml
$ repo sync$ MACHINE=imx95-19x19-lpddr5-frdm-pro DISTRO=fsl-imx-xwayland source imx-setup-release.sh -b frdm-imx95-pro$ bitbake imx-image-full$ zstdcat imx-image-full-imx95-19x19-lpddr5-frdm-pro.rootfs.wic.zst | sudo dd of=/dev/sdx bs=1M && sync或使用uuu将镜像烧写到SD卡上:
$ uuu -b sd_all imx-image-full-imx95-19x19-lpddr5-frdm-pro.rootfs.wic.zst4. Developer Experience (开发人员体验)
为了帮助各种技能水平的用户加速开发,恩智浦提供了丰富的示例应用,以展示该平台的各种特性和功能。
4.1 Application Code Hub (应用代码中心)
工程师可以通过应用代码中心 (ACH)资料库轻松查找由恩智浦专家开发的微控制器和处理器软件示例、代码片段和应用软件包及演示。在代码中心,可轻松快速且一致地查找微控制器和处理器应用。
ACH提供筛选和搜索选项,帮助您快速找到特定应用。借助Git功能,您可以在用户开发环境中轻松导入并使用应用。
如需了解ACH的更多详细信息,请访问此链接。
要查找FRDM-IMX95的可用示例应用,请在“器件系列”中选择“i.MX”,如下所示。
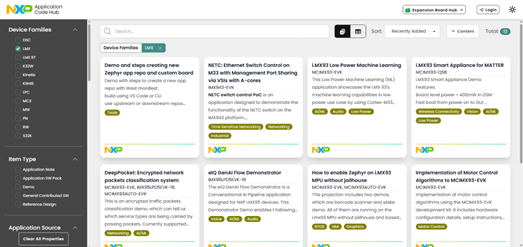
选择每个示例应用以查看其详细信息。
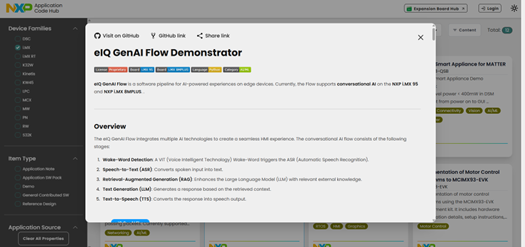
要获取每个示例应用的源代码,请点击顶部的“访问GitHub”按钮,访问恩智浦GitHub中的代码库。

4.2 面向i.MX应用处理器的GoPoint
面向i.MX应用处理器的GoPoint是一款用户友好型应用,可启动随Linux BSP提供的预构建应用,为用户提供卓越的开箱即用体验,让他们亲身体验i.MX SoC的各项功能。GoPoint不仅突出了高级功能,还提供了实用的实现解决方案,并在GitHub 中提供了应用的源代码和构建配方。
如需了解GoPoint的更多详细信息,请访问此链接。
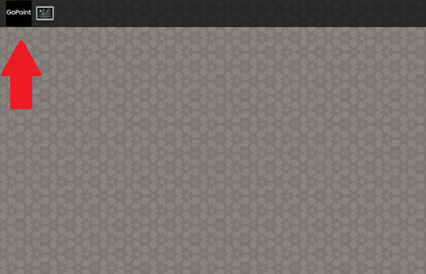
对于FRDM-IMX95-PRO,GoPoint默认包含在BSP发布版本中。要打开GoPoint GUI启动器,请在FRDM-IMX95-PRO启动后,按下屏幕左上角显示的“GoPoint”标识,如下所示。
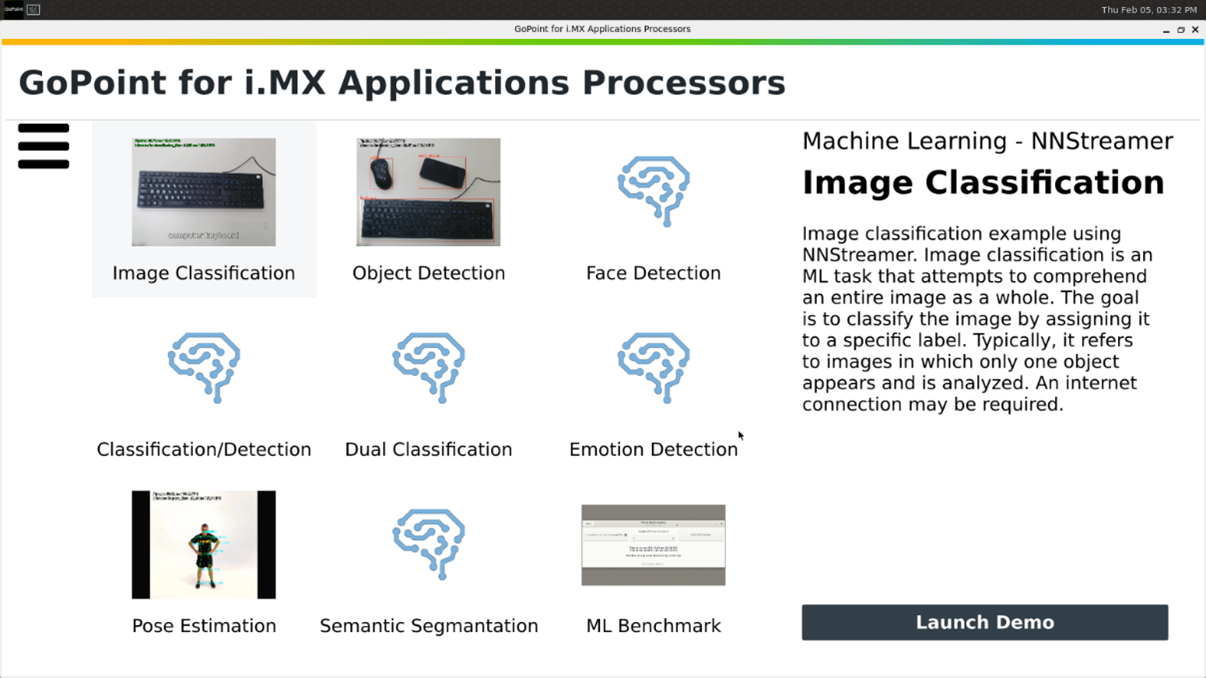
然后屏幕上会显示可用的示例应用以及每个应用的屏幕截图图标。选择示例应用时,右侧会显示此示例应用的简要说明。要启动当前选定的应用,请点击“启动演示”按钮。
应用启动后,可以通过点击启动器中的“停止当前演示”按钮(应用启动后出现)强制退出。
有关每个应用用法的详细信息,请参阅《i.MX应用处理器GoPoint用户指南》(文档GPNTUG)。
1. 调试终端设置
在Linux中调试终端
串行通信控制台的设置
FRDM-IMX95-PRO使用CH9114F芯片作为串行端口。串行转USB驱动程序可从CH342F Linux驱动程序 中获取。
在Linux主机的命令提示符下运行以下命令,确定端口号:
$ ls /dev/ttyCH343USB*应有4个端口。假设为ttyCH343USB0-3。
强烈建议将4个端口全部打开,因为Arm Cortex-A55、Arm Cortex-M33和Arm Cortex-M7内核的端口映射不固定。
Minicom
使用以下命令安装和运行串行通信程序(以minicom为例):
- 使用Ubuntu包管理器安装Minicom。
- 启动Minicom,使用先前确定的端口号通过控制台窗口进行
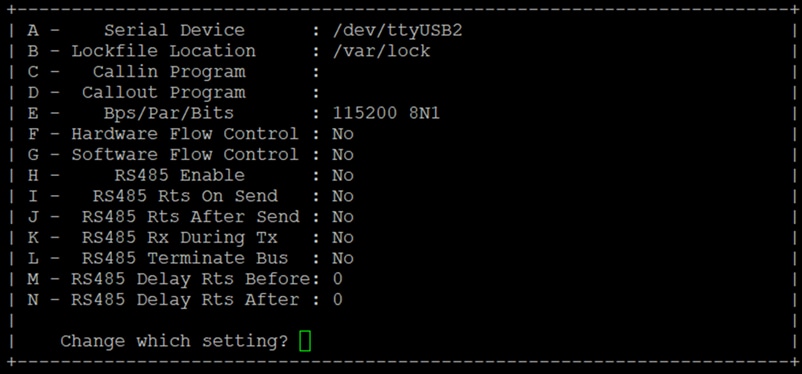
$ sudo apt-get install minicom$ sudo minicom /dev/ttyCH343USB* -s选择串行端口设置,然后进入“配置Minicom”,按如下图所示。
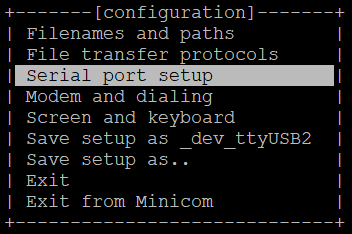
完成所有设置后,按回车键返回上述配置窗口,然后进入"Exit"(退出)选项卡并按回车键Minicom将开始显示来自板串行端口的消息。
在Windows中调试终端
串行通信控制台的设置
FRDM-IMX95-PRO上的CH9114F USB串行芯片枚举4个串行端口。假设端口为COM11、COM12、COM13、COM14。第一个端口(COM11)用于Arm Cortex-M7的串行控制台通信。第三个端口(COM13)用于Arm Cortex-A55。第四个端口(COM14)用于在Arm Cortex-M33上运行的系统管理器。
如果连接到互联网,驱动程序将通过Windows Update自动安装。串行转USB驱动程序可从CH342F Windows驱动程序 中获取。
Tera Term
Tera Term是一款开源终端仿真应用。此程序显示从恩智浦开发平台的虚拟串行端口发送的信息。
- 下载Tera Term。下载完成后,运行安装程序,然后返回到该页面继续操作
- 启动TeraTerm。选择串行选项。假设已连接了板,列表中会自动填充4个连续的COM端口。
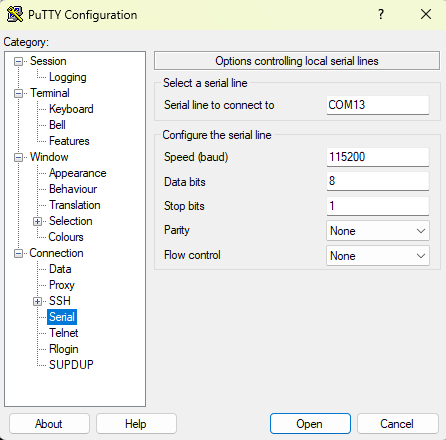
- 配置串行端口设置(使用之前确定的COM端口号),波特率为115200,数据位为8,无奇偶校验位,1个停止位。要进行此操作,进入Setup→Serial Port(设置→串行端口),并更改设置
PuTTY
PuTTY是一款广受欢迎的终端仿真应用。此程序显示从恩智浦开发平台的虚拟串行端口发送的信息。
- 下载PuTTY。下载完成后,运行安装程序,然后返回到该页面继续操作。
- 通过以下方法启动PuTTY:双击下载的可执行文件或从“开始”菜单启动,具体取决于您所选的下载类型。
- 选择“串行”,并按下图所示进行配置。
- 点击“Open”(打开),打开串行连接。假设板已连接,并已输入正确的COM端口号,且终端窗口已打开。
2. Cortex-M7使能
Cortex-M7使能
FRDM-IMX95-PRO包含一个主频高达800MHz的通用Arm Cortex-M7内核,可用于实时和低功耗处理。关于如何在Cortex-M7内核上构建和运行程序,开发人员可以参考应用笔记AN14748《如何在i.MX 95的M7内核上运行应用》。
关于如何调试在Cortex-M7内核上运行的程序,开发人员可以参考应用笔记AN14120《在i.MX 8M、i.MX 8ULP和i.MX 9上使用VS Code调试Cortex-M》。
3. 在NPU上部署ML模型
FRDM-IMX95-PRO配备神经处理单元(NPU),其最高运算性能可达8eTOPS,用于加速神经网络机器学习推理。如需了解有关NPU硬件架构的详情,请参阅《i.MX 95应用处理器参考手册》。如需了解有关NPU软件架构的详情,请参阅《i.MX机器学习用户指南》。
模型量化
要利用NPU进行加速,神经网络算子必须量化为8位(无符号或有符号)。对于模型量化,请下载最新的eIQ工具包,并查看用户指南。
模型转换
要通过NPU进行加速,需要使用neutron-converter工具对量化的模型进行转换。最新的neutron-converter工具包含在eIQ Neutron SDK中,可以从eIQ工具包页面下载。请按照eIQ Neutron SDK中用户指南的说明来转换适用于i.MX95的模型。
模型推理
要评估NN模型在NPU上的性能表现,最简单的方法是使用Linux BSP中的benchmark_model工具。该工具使用随机数据作为输入,并给出指定运行次数的平均推理时间。以下是一个示例:
root@imx95frdm:~# /usr/bin/tensorflow-lite-2.19.0/examples/benchmark_model --graph=/usr/bin/tensorflow-lite-2.19.0/examples/mobilenet_v1_1.0_224_quant_converted.tflite --external_delegate_path=/usr/lib/libneutron_delegate.so关于如何使用C++和Python编写代码,在NPU上运行模型推理,请参考GoPoint 中的示例应用。
4. 使用系统管理器
使用系统管理器
FRDM-IMX95-PRO搭载了一个主频高达333MHz的Arm Cortex-M33内核,专门用于运行系统管理器(SM)。SM是恩智浦提供的一款应用程序,旨在管理SoC中其他处理器的低级资源。
Cortex-M33是启动内核,运行启动ROM,启动ROM会加载SM (及其他启动代码),然后跳转到SM。随后,SM会配置硬件的某些方面(例如隔离机制),然后启动系统中的其他内核。启动这些内核后,SM会进入一种服务模式,通过基于Arm系统控制与管理接口(SCMI) 的客户端RPC API,提供对时钟、电源、传感器和引脚控制的访问。为了促进内核之间的隔离,SM将SoC划分为多个逻辑机(LM),这些逻辑机对硬件和RPC API调用具有静态可配置的访问权限。
SM以源代码形式存储在Github imx-sm 库中,让客户可以根据自己的需求自由修改和重新编译其代码。但恩智浦建议,任何旨在扩展SM功能的改动都应仅限于在客户自己的板层面进行。要扩展SM功能,开发人员可以参考《通过板控件扩展i.MX 9系统管理器功能》(文档AN14478)。
5. 使用VPU
使用VPU
FRDM-IMX95-PRO配备包含解码器和编码器的视频处理单元(VPU),支持H.264/H.265 4Kp30解码和H.264/H.265 4Kp30编码。
要对VPU进行测试,最简单的方法是使用以下命令播放MP4视频文件:
root@imx95frdm:~# gplay-1.0 MP4_EXAMPLE_FILE.mp4gplay-1.0将自动选择VPU作为视频解码器,并在Weston桌面上播放MP4文件。如果连接了HDMI显示器,应能看到视频画面。
如需了解更多关于在应用中使用VPU API的详细信息,请参阅《i.MX VPU应用程序编程接口Linux参考手册》(文档RM00294)。
6. 使用ISP
使用ISP
FRDM-IMX95-PRO具有5亿像素/秒的MIPI_CSI和ISP (两路4通道,2.5Gbps/通道)以及PHY (1路与DSI复用)摄像头接口,该接口通过MIPI虚拟通道支持1路4Kp60fps、两路4Kp30、4路1080p60或8路1080p30摄像头输入。
要测试ISP,可将EXPI-OS08A20摄像头与FRDM-IMX95-PRO搭配使用。
u-boot=> setenv fdtfile imx95-19x19-frdm-pro-os08a20-isp.dtb
u-boot=> boot
在FRDM-IMX95-PRO启动且连接了OS08A20摄像头后,请运行下面的命令搭建环境并打开OS08A20的摄像头预览:
root@imx95frdm:~# cam -l
root@imx95frdm:~# export LIBCAMERA_IPA_MODULE_PATH=/usr/lib/libcamera/ipa
root@imx95frdm:~# export LIBCAMERA_PIPELINES_MATCH_LIST='nxp/neo,uvc'
root@imx95frdm:~# export LIBCAMERA_IPA_CONFIG_PATH=/usr/share/libcamera/ipa
root@imx95frdm:~# export CAMERA0="/base/soc/bus@42000000/i2c@42540000/os08a20_mipi@36"
root@imx95frdm:~# gst-launch-1.0 libcamerasrc camera-name="${CAMERA0}" ! video/x-raw, width=3840, height=2160, format=YUY2 ! queue ! waylandsink如果HDMI显示器上正确显示出摄像头预览画面,则证明ISP正常运行。
如需了解关于ISP用法的更多详情,请参阅《i.MX 95摄像头移植指南》(文档UG10215)。
7. 使用GPU
使用GPU
FRDM-IMX95-PRO配备了Mali-G310图形处理单元(GPU),其工作性能最高可达60GFLOPS (高精度),支持OpenGL ES 3.2、OpenCL 3.0、Vulkan 1.2。
要测试GPU性能,最简单的方法是运行glmark2-es2-wayland基准测试,命令如下:
root@imx95frdm:~# glmark2-es2-wayland --fullscreen除此之外,在FRDM-IMX95-PRO默认rootfs文件系统的/opt/imx-gpu-sdk/文件夹中还安装了许多其他GPU示例应用,可以直接运行该二进制文件,或通过GoPoint启动应用。
如需了解关于GPU用法的更多详情,请参阅《i.MX图形用户指南》(文档UG10159)。
8. 快速启动
快速启动
在某些应用场景下,对设备启动时间有最短时限要求,即设备必须在限定时间内完成启动过程。
为优化启动时间,FRDM-IMX95-PRO在U-Boot中支持Falcon模式。Falcon模式是U-Boot的一项功能,它允许SPL直接启动Linux内核,从而实现快速启动。它完全跳过了U-Boot的加载和初始化步骤,从而减少在引导加载程序中花费的时间。
关于如何启用Falcon模式以及进一步优化启动时间,请参阅《通过Falcon模式及内核优化在i.MX 8和 i.MX 9上实现快速启动》(文档AN14093)。